Sunday, October 31, 2010

Dust It Off Sunday - 2 - Alota Halloween

Hello and Hope you are having a wonderful Sunday - This is Dust It off Sunday #2 - and this week I dusted off my perfect for Halloween Alota Rubber Stamp images. Alota Stamps are something very special to me. I treasure each one of them I have, and totally ADORE Helene the owner of Alota... I don't think I could pick just one favorite of her million images she has on her website, but I really do love her background stamps. They are so perfect to use with any image or brand. So when trying to decide what I wanted to dust off for this Sunday and realizing that it is actually Halloween, the Haunted House Background stamp came in mind as the perfect stamp for a Halloween card - all though the house doesn't look too spooky to me, I wouldn't mind moving in. Just needs some pretty flowers and maybe a donkey grazing in the yard. :0)
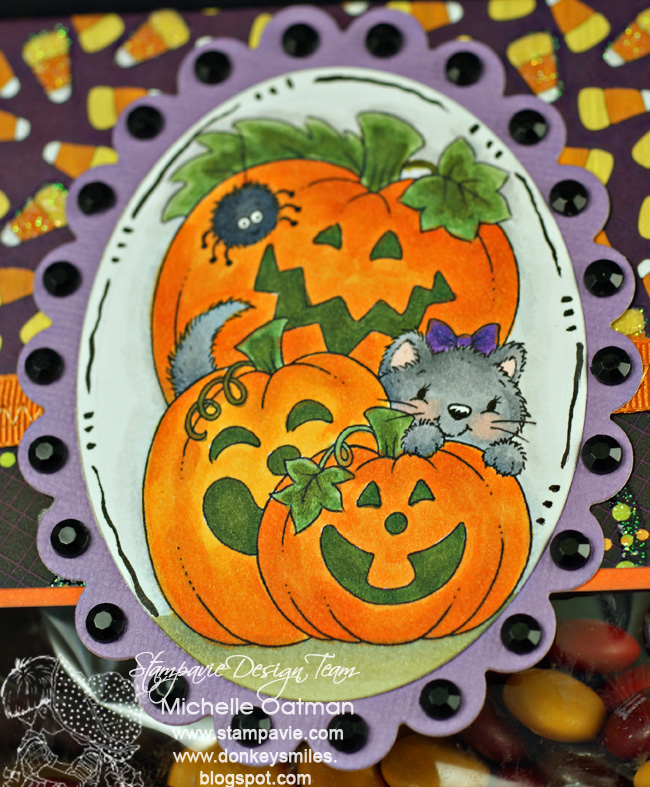
Colored with Copics ( colors listed below ) I then cut the image and matted on Bazzill Bling orange card stock and sewed with a zig zag stitch. I found a piece of trick or treat candy in my stash, but again ... no name on the back of it. Sewed to a purple card stock, then placed on a 6x6 piece of the orange card stock. This way I could create an easel card with a 6x6 of the same card stock.
I then found two trick or treaters to pop dot coming off the road from the house. These are also Alota Rubber stamp images - I think they are just too cute. Love the fun child like feel of these two.

For the base inside I matted the pattern paper, sewed and then placed on the bottom, I cut a fancy Spellbinders tag - for the sentiment "Happy Halloween!". Also from Alota. While digging looking for the two orange buttons to place inside to hold the easel of the card, I found two pumpkin buttons. I cut the back off them and glue dotted them down for some added fun.

Was fun digging out some wonderful stamps that haven't seen the light in a while, and that is the whole purpose of my Dust It Off Sundays... if you would like to join me in pulling out an older stamp that needs a dust off and some ink to feel loved - please do so and then leave me a comment so I can visit you and see what came out your collection!

Have a wonderful Sunday - Already working on next Sunday's image... I am just having a blast digging through my stamps to see what I want to use for each week! Love my new stamps... but remembering how much I love the older ones too!

HUGS and-

Copics Used: B000, B21, B23, B34, B93, BV08, C01, C02, E000, E09, E27, E31, E37, E39, E53, E59, E74, G02, B85, R20, R37, Y08, Y11, YG91, YG97, YR21, W07, Black 100 and Blender Pen.

Saturday, October 30, 2010

Animal Crackers - Meet Juliet

Hello and Happy Saturday! I wanted to show off photos of our new Standard Donkey I told you about last week - Juliet, Ted E. Bears Sister. Now it will be at least 4-5 months before she can come home to us, but she isn't far so we can visit her.


These were taken from Hubbies phone... Not bad considering. Isn't Juliet adorable. It is so funny walking up to her knowing she is only a month old. She is already taller than all our minis :0) And oh so very sweet - Hubby says he wants to make her a riding Donkey.... I don't know about that. We will see.  She is gorgeous though -
 Rico - Isn't he handsome. He is our one of our gelded buddies. Poor thing was really traumatized when we purchased him.. I say rescued. The family that had him before wasn't very nice to him, the kid was actually pretty hard on him. Took us months to even get him to stand still and let us touch the end of his nose. But now... years later, he is a real sweetie. Still very cautious and jumpy at times, but he really does love attention.


You know I had to show at least one photo of Libbie and the puppies right? She has been just an amazing Mom - She won't leave them for a second. I have her food right outside her crate and she will just stick her head out grab a bite and goes right back in. Wonderful Mom indeed! I am so proud of her.... And you will be seeing lots of Puppy photos in the next couple of months ;0) Hope you are ok with that.

I have a couple of other donkey photos I was going to show today... but for some reason Blogger won't let me load any other photos... hate when I don't know how to make it do what I want....

Have a wonderful weekend...
HUGS and-

Friday, October 29, 2010

Just Magnolias - A wonderful Sketch -

Hello and Happy Friday -
Man I am still wiped out from all the excitement from Libbie's Puppies - :0)

I did manage to get my card made for Just Magnolias  - was getting nervous that I wasn't going to make it this week as every time I would sit down and work on the card Libbie would make a noise and I would run to check on her. Can you say Nervous Granny?  Oh my you should here these three little things - how does something so tiny make so much noise? OH wait, they are Libbie and Autie's puppies... it is just in their genes.

Here is my card for this week's Just Magnolias - It was a wonderful sketch this week - and it worked really well for not only my ice skating Edwin and Tilda image that I love so much, but I was able to make it work with a sheet of the Thomas Kinkade pattern paper. I just love his work and when I found these papers I fell in love with them. But I won't lie... they are hard to use for cards as well... you cover so much of it up! But I think this worked pretty well.
 I sewed the pattern paper and the image to mats of semi-solid pattern paper that was in the Kinkade collection. The sentiment is from Stamps by Judith. Love it.
 
 For my flowers, I found two off white flowers, the larger one I sprayed with Silver Smooch Mist - The smaller one, with Vanilla Smooch Mist., then I added three chandelier crystals - mine are actually from the bridal department, love them! Even if it is hard to see them in the photo. I then punched out Martha Stewart Branches out of vellum. Now the first plan was to spray them with the Smooch... they sure were pretty just after I sprayed them. Sigh... and then they curled up into small tight little balls. So note: No smooch on Vellum. I punched a second set of them, and then after attaching them to the card I went back and high lighted them with Stickles.
My Ice Skating couple are colored with Copics (colors listed below) I then went back and added Dimensional Glaze to the "ice" and then stickles to Tilda's coat and for some "snow" falling. I really like how this all came out. In person it has a really cool look.

I hope you like my Winter Scene... Now skate on over to Just Magnolias and see all the gorgeous DT work, and join us for this fun sketch!

See you tomorrow for Animal Crackers :0)
HUGS and
 
Copics Used: B0000, B34, B45, C02, E08, E09, E39, E44, E79, G21, G24, R20, N0, N02, V01, V04, YR21, YR24 - Blender Pen

Thursday, October 28, 2010

LIBBIE HAD HER BABIES!!!!!!!!

Oh my I have an ulcer, and have aged 20 years in the last 24 hours! But last night Libbie had her puppies!!! OH it was so exciting, and so fabulous that she didn't seem to have any problems. We will take her and the puppies to the Doc this afternoon- one to check on her and the babies.. and two to get the puppies tails cut. I hate that... but it has to be done. I am sure I will cry.

You really want me to stop babbling and show you photos right? Sorry I have had like maybe and hour or two of sleep.

How stinking cute is this!
It was a long night for all of us! Even Autie.. who didn't sleep much and has an upset tummy this morning from worrying about his Libbie and what the heck was going on in that box! But seriously... Adorable or what??? Now if you look close, you can see Libbie of course, and three little bodies... two look like Autie and one is a copy of her Mom - Two girls and one Boy.  "Mini Libbie" as I have been calling her - never stops - she is the largest, and the loudest and you can tell... just like her Mom... will be in control.

How about some close -ups?
 Puppy #1 - was born just after 8pm - and weighed in at 5 oz - Looks like she might have some really pretty coloring. The copper coloring doesn't show until much later. But she seems to have some under her jaws, and hind legs - we will see :0)
 Puppy #2 - Came after 10pm.. yes that was a VERY long two hours!! She is the biggest of the three - a huge whopping 7 oz! Her coloring is just stunning - can't wait to see how she matures. Look at all that silver!
Puppy #3 - Well he was a surprise - about 12:30AM Libbie had calmed down and was resting, we cleaned her and the crate up a bit, and started to settle into going to bed ourselves. I decided to check one more time before passing out - and Uh... there are three puppies now! LOL This little Guy is the smallest of the three weighing in at only 4oz. He has a lot more white on him, than puppy one. But oh my is he an active dude! He is always squirming!

Can't wait to see eye colors!! But I will have to be patient that won't happen for a while. I hope we have some blue eyes there somewhere -  I just love Libbie's Ice Blue Eyes - In reality - as long as they are all healthy - I am Happy!

HUGS and -

Wednesday, October 27, 2010

Me and My Space - Copics

Well today I am starting something new for Wednesdays - I hope you like it :0)  I get emails once in a while asking me how I store something, or organization of a product. So I thought it would be fun to share my craft room with you and how I have found to store things that best work for me. Now 1st you have to understand that I am constantly re-working my space. Always looking for a better way to store things. That will make more room... for more things. Hubby built me this craft room last year, and I don't think in a million years I could talk him into adding on to it - so I have to make things fit! And since I keep adding to my stash, and very rarely throw anything away... I have to organize the best way possible!

So this is my First "Me and My Space" post - I will try and show off something new each Wednesday - But I decided 1st up would be one of the most used items... "MY COPICS"  I have gone through lots of changes in how I store them over the past couple of years. The best has been the stackable Cubes - I started with the X-box type of pen storage that I laid on their sides. They come with clips to hold them together - Love these - But soon I had too many markers and each side of the "X" was not large enough to sort my colors in. So I went to the shelf system. Now I have to tell you I had to alter these just a tad.


You see the shelves are only 1/2 way in the box. So I added a piece of chipboard to each shelf to bring it out level to the front. Otherwise the markers fall off the front of the shelf. I have had these forever, and used these for many different products over the years - but I think this is it for them. You can see I still have one "X" box. I am one short of the shelf boxes, I haven't been able to find them locally any longer and well... just too lazy to order just one box online. But once I need something else I may add that to my order so things are all level. LOL you can tell I re-use things and I buy when things are on clearance... you can see the top right box is blue - the rest are clear. That blue one was on the 75% off shelf... I think I paid $2.00 for it. Wish there were more...darn it!

So you can see I sort by the color system. And there is a shelf for each color in the Copic selection. Except... all the yellows are all together. (Y, YG, YR) and all the Grey shades are together- Some day I may need separate them, but for now this works. I also store my pop dots on one shelf. And in the "X" box I have my purples (don't have many of them), my Spica Glitter pens, Copic Muli-liner pens, Glaze Pens and my  Koh-i-noor Polycolor Pencils.

On top of my Copics is where I put my "Just Finished" Cards, you can also see my Tissue Box from last week, and the mini file folder I made a couple of months ago, this stores my Stampavie images and my Stamps by Judith sentiment stamps. OH and you also see a photo of my Hubby :0)  Even though he is usually sitting across the room from me, I still love having a photo of him on my desk. I change this out from time to time with new babies in his arms.

You also see a peek of My Eeyore Cup and pen in the bottom of the top photo... that is really all "me" - love having fun Donkey items all around me while I am working - and you will see this as I show off my space - Hope you enjoyed my first post for this series. And let me know if you want to see something up close -

HUGS and -

Tuesday, October 26, 2010

Spoon Full of Sugar - Die Cuts

Hello and Happy Tuesday - Today is Spoon Full of Sugar day and this week it is all about Die Cuts- I just love an easy theme that lets us use one of our favorite toys.. I mean tools... LOL
I started with A Sarah Kay image - This is one of the new Autumn releases -Francesca in the winter field - the last time I used her I went with all traditional Fall Colors. This time, I went with girlie colors ;0) Love pink and green - Colored with my Copics (I have been listing my colors used at the end of the post) I then cut out with my Nesties. (My first use of a Die cut for this card)

I then had some fun with lots of pink and green!! A while card base, with a dark pink card stock mat. I zig zag stitched a piece of pattern paper from my scraps. Then I made me second Die Cut item - First time I have used my Marianne Designs Border Die. Really love this one, I cut it out, then ran it back through with an embossing mat, and WOW... love the texture and design it give it. I very lightly inked over the edges and the embossed flowers and lace with pink ink. I then ran a piece of small satin ribbon through the holes and tied a bow.
Then to my Third Die Cuts! Love Love Love these - I used my new Heartfelt Creations stamps that are made to match Nesties Dies! This stamp set is the Sunburst Flower - and it works with Dahlia Flower Die set. So cool how I just stamp - and the dies just fit over the flower shapes and cut out perfectly! I cut three different sizes and then inked the edges. For the added bling factor I added a pink flourish - I would like to say they are rhinestones, but they are actually a very cheap pink plastic... LOL but if you don't look to close you can't tell that. Now the next step...well I wish I hadn't done it, but once I did it ... it was too late. I added a touch of glue to the edges of the flowers and then added Glitz - really a gorgeous product that I am just not to good at using.... really sparkles and looks wonderful on the Heartfelt Creations website, but well mine... I ended up wiping a bunch off as it just didn't look right. Looks like crushed glass and large glitter really beautiful - I just need lots more practice with it.

So I used LOTS of die cuts on this one card - But for your card as long as you use one you can add it to the challenge for a chance at a great prize! Now visit the Spoon Full of Sugar to see the other DT Die Cut creations! 

Well have a wonderful Tuesday... me... sticking close to home... keeping a close eye on Libbie - still no babies....

HUGS and-
 
Copics Used: B41, BG0000, C1, E000, E25, E31, E35, E57, G12, G40, G82, G94, G99, R01, R37, R89, RV11, RV95, W1, Y23, YG 63

Sunday, October 24, 2010

Dust It Off Sunday - House Mouse "Feather Bed"

I had so much fun last week making my friend the House Mouse card, and enjoyed using a stamp that hasn't had any love or ink in like... forever that I am going to challenge myself to use one older stamp a week! I am not too sure about my title... but I am thinking that the best way to push myself into using these 4million 382,000 stamps I have is setting a day and giving it a title. Encouragement, and will give me a routine, kind of like Animal Crackers Day... So I am thinking "Dust It Off Sundays" --- cuz seriously I have had to dust off these stamps... doesn't say too much about my own house cleaning LOL... Always have hated dusting.

So you will be seeing my old House Mouse, Hanglar, Alota, High Hopes and lots and lots and lots of other images on Sundays - Also I am going to try and use my older stash stuff - really need to use up the mile high pile of papers I have too :0)
Here is the image for today - I love this one :0) It is called "Feather Bed". Great Country feel - adore that chicken. I colored with my Copics and then sewed the edges.
Digging deep into the stash of older paper I found some wonderful country feeling papers to work with the chickie. This is a collection of papers, I know I bought them as a small stack, and I adored them, but I can't find a name anywhere on them now. There is no cover, and there is no names printed on the backside of any of them. I think it had a name something like French Country... or something like that. Anyway they are just wonderful, worn, country looking papers. The blue actually is a barn wood photo, and I have always been drawn to newspaper prints. Everything is sewn together on a light beige card stock and a chocolate mat. The Sentiment is from Hero Arts, and punched out with a Stampin Up Tag punch. I cross - stitched the tag onto the front of the card with twine... hmmm was a good idea that just doesn't show like I thought it would. And Lovin' those buttons!! I found them in an antique shop a while back. They are ancient pearl like buttons, dirty and flaking. I added twine to them as well.

Hope you like my idea - if you want to join me I would love to see what you dust off -leave a comment so I can come and visit :0)

I have something else in the works for Wednesdays... :0)
HUGS and have a wonderful Sunday!


Copics Used: E000, E31, E55, E57, R20, R37, RV34, T1, T3, T5, Y26, Y17, Y23, YR 24, W7 and a blender pen.

Saturday, October 23, 2010

Animal Crackers - Some News.. and JUMPING Goats!!

Saturday! Animal Crackers day! First... Hubby went and added to our "Livestock"... We were coming home the other day and past the home of Ted E. Bears parents. There was a new baby - we love to stop and visit Teddies Mom and Dad and Little Brother or Sisters. They always find great homes for the babies, and they are usually nice, but not quite as friendly as Teddie. He is just super outgoing. Well.. the new Little Girl "Juliet" is just as outgoing as her older brother. We loved on her, and got in the car and came home. A few hours later Hubby came in the back door and said.. "Oh by the way - we own another standard donkey" With a big Grin on his face. He called them, and said he wanted her. I knew it... this is why we have so many donkeys and why when we first married we had 6 cats at one point. The guy is a big sweetie.... And I have to admit, if Juliet is even 1/2 as sweet as Teddie... she will be very loved -
 While out taking photos yesterday evening... Chloe was on the old dog house. The Goats love the top of the old dog House. They stand on it and even sleep up on top of it. But the best thing about the dog house.......
 
 JUMPING OFF OF IT!!! YEEEEE HAWWWW!!!!  How great is this photo! Can't believe I caught it! I was so proud!
 And then I caught Jill jumping too! She may be little.. but she can do all that the big goats can!
 I got a great photo of Marisa - is that a face or what! She is such a sweetie, tall... but a sweetie :0) I am hoping to capture her running this week - she has really been given some freedom from her Mom Patti - and she LOVES running, bucking and kicking. She is faster than both of her much older 1/2 Sister and 1/2 brother - It is those really long gorgeous legs.


Well that is all for today - it was getting a little dark - as the Internet repair guy was here late afternoon. Yes, a new Modem, and part of a new Dish and we have Internet - that seems to working pretty darn good so far. Now this is the first thing I have done on it.. but hey it loaded my photos much quicker and hasn't logged off so far so that is an improvement in my books! YEA!!!

And yes, I know there are no Libbie or Autie photos this week... If I counted correctly and the rolly polly bellie on Libbie is pregnant and not just gaining 3-4 pounds in one month (remember she only weighed 11 pounds 60 days ago). We should have babies this coming week - I AM SO NERVOUS! So I am really hoping all goes well - and I will return at some point to show off really tiny puppies. OH I AM SO NERVOUS!!!!

HUGS and-

Friday, October 22, 2010

Just Magnolias - Think Pink!

Hello and Happy Friday! Today is Just Magnolias Day - and today the theme is to "Think Pink". I think we all know that this month is Breast Cancer Awareness Month, so the theme is just too perfect for a wonderful cause.

Now seriously.. my card is much pinker than it looks. For some reason my photos just didn't take well this week.
 Oh well.. just "Think Pink" while looking at my card - it is really cream and pink in real life. So my card is created with Webster's Pages "Your live Beautiful" pattern paper. Two sided paper is so wonderful, no guessing if it matches... the company says it does so it does.. LOL I just adore the richness of these papers, and the images of the roses are gorgeous. I knew I wanted to use this Tilda when I pulled this paper. I usually start with the image, then find the paper, but was a bit backwards with this one. I sewed everything together. I added a pink ribbon... and some wonderful Wild Orchid Crafts - mulberry roses. They too were just the perfect shade of cream and pink to match my papers... trust me they are :0)  The sentiment is from Stamps by Judith.
 Tilda is paper pieced. I love matching her dress to the pattern papers when I can. Shame I don't work that hard to match my own.... LOL I also added one of the mulberry roses to the image, perfect size.
 I sprayed the entire card with Smooch Spritz - Vanilla... just a bit, to add some life and more bling to the card -
The roses are sprayed as well, love that shimmer to them. Really adds a lot.

So now pop on over to Just Magnolias and see all the other DT "Think Pink" cards - they really look pink -

Hope you have a wonderful Friday planned... me I am sitting and waiting for the Satellite Dude... yep - we are upgrading our Internet, and just like I thought, we are out of date again. OH the old dish will work for a while longer... but they have a new technology and with a newer dish and newer modem we will speed up our Internet and we will... no should... stop having the crashing and slow speeds. We will see, at least they had a really good special going on this month, so it isn't costing us a fortune.   WE will see.....

HUGS and

Wednesday, October 20, 2010

Tissue anyone??? Love this template!

I have been dying to use the Tissue Box template from Diane at the Stampavie DT Blog.
 I went a bit nuts though.. LOL Like I always do, when I look forward to doing a new project. I followed the template, Went really smooth and didn't take very long to put together. Then I went to the "decorating" That took me some time. I cut out panels for each side, inking and matting each of them, then sewing them each. The image is Sarah Kay - love her, I have colored with my Copics and then cut out with Labels Nestie 17, and again inked. Digging in my stash I found two Bosskutz dies, the flower and the flourish - I cut three of the flower in different scraps, on one of the flourish - stacked them all and for some "bling" I added six pink rhinestones. Then to the top decoration.... time again. But love how it came out.
 You think I over did it? LOL may have, but still love it! I created sewn panels for the sides, and with the same pattern the top. The center is cut out of oval Nesties, and a larger oval for the pattern paper. I then found another Bosskutz die, that is a corner scroll pattern. I cut four of them out - and added four more pink adhesive rhinestones. May be a bit busy... but I think I like it anyway.

This was so much fun to make! Even if I had to make a special run into town to get the right kind of tissue box. - I always buy the long flat kind - so I didn't have any to fit the template, but have them now, so I am ready for the next aahhh choo here!

Thanks so much Diane for such an easy wonderful template! I am thinking I might make a couple of more of these as gifts! What a wonderful "sick present" for a loved one with a cold.  HA.. do you guys do "sick presents"? My family does at times, it is a great reason to get yourself something you have been wanting when you are down and not feeling well. The bigger the "sick" the bigger gift you can ask for. At least that is my rule :0) 

Have a wonderful Wednesday -
HUGS and-

Tuesday, October 19, 2010

BOO! Tina Wenke's Halloween Goodie Bags

Today at the Spoon Full of Sugar there is something scary .... BOO! To make a Halloween project - I got a chance to have some fun with a couple more of the Stampavie Tina Wenke Halloween images, after I made my M&M Goodie bag the other day - I decided that I "needed" two more of them... I do have three small nieces and nephew that still have fun with some trick or treating.
These are simple bags to make, stamp the image, color with Copics, then just stack up some fun Halloween papers. My baggies are a few of my clear 6x6 envelopes. I had no plan for the papers, just flew with them. Using my Martha Stewart goo punch on one, Cloud Nine glitter patten papers and Nesties for die cutting. 

 I adore these images :0) They are just too cute and perfect for little ones treats.
I really can't tell which one is my favorite, but I really do love the kitty in this one.... OH and on this one I went through a whole bunch of my black adhesive rhinestones.  But they do add so much, even if the kids will just tear the outside a part and pitch to get to the candy... LOL

Now creep on over to A Spoon Full of Sugar and see all the wonderful Halloween goodies the other DT came up with, then why not join us in a BOO for someone!

Monday, October 18, 2010

SPOOKY Stampavie Challenge!

BOO! hope I didn't scare you... but today is the Stampavie Challenge and the theme is to use Spooky Colors! - Now the new Stampavie Tina Wenke Halloween images are anything but spooky... more adorable, just love them!

For my card - I went with the Kitten in Pumpkin Costume, I came so close to buying Autie a pumpkin costume this last weekend, but passed... but he would have been just as adorable as this kitty I am sure!
So for my spooky colors I started with an orange coredinations card stock, matted with purple. I love this combo.. and sometimes Halloween is the only time the work so perfectly together. I found 3 pattern papers from the Cloud Nine glitter collection. Then sewed them all together with a bright orange thread, zig zag stitch. I again used my K I Memories Happy Halloween sentiment ribbon, it is almost gone... will be sad as it is has been fun, and it has the adhesive already on it so it is really quick to use.

The image is of course colored with my Copics... except for the sky. Loving using the iridescent chalk  - gives the sky a bit of sparkle. The carded seemed to need just a bit more, so I added a Want 2 Scrap bling flourish - love them, but it really doesn't show well on this card does it??? Darn it...

Now creep on over to Stampavie's Blog and check out the other DT Cards and join us yourself! Great Surprise again this week for a prize!

HUGS and -
 
Copics Used: C1; E000; G94, G02; RV06; R46; N3; V04, V06; Y15, Y38; YR04, YR24; YG63, YG97, YG99 and Blender Pen

Sunday, October 17, 2010

Some fun with Mice!

Now I wish I could tell you it is just fun with the House Mouse I used on my card for today... but no... yesterday was an insane day with a tiny little mouse!!! A REAL LIVE ONE! Gato found it, yea! She did her "job" for the first time, but you see, she didn't want to kill it. She wanted to carry it around, play a little with it and generally just keep it. UH NO... that won't work. At some point she dropped it and Autie got a hold of it! Then it was a chase around my house the mouse, Autie and Gato. Totally stressful, and frustrating - finally I got Autie outside, with the mouse, and then said that word.. "Cookie?" He dropped the mouse outside, and looked up at me, giving the mouse just enough time to run off into the weeds.  Now it was live catch and release program and I would love to let you think how kind I am to all living creatures... but NO I wanted that little thing killed and no chance that it was coming back into my house!!! But I will settle and tell myself that it is outside, and gone....

Now for some Mice that I do like... whew...

I have a ton of House Mouse stamps, adore them. But honestly haven't inked them up in forever, they just sit on their shelves decorating my room. But I needed a fun "MAN" card, a friend that loves Coffee as much as Hubby does. And I have to tell you I really enjoyed inking this one up and coloring it. Need to challenge myself to use at least one old stamp a week to give some of the million stamps I have some love.

So here is my card -
 I wanted it to stay simple, and focus on the large image. That has always been the biggest struggle for me and some of these HM images, they are large.  My base is a cream colored card stock, layered with a darker chocolate or coffee colored brown. I then used scraps of Basic Grey papers - With the same color as the base, I punched two EK Success small scallop borders, and then sewed everything down. Simple - but for a man I think just enough.
 The image is colored with my Copics and high lighted with white gel pen. I just love the looks on their faces... LOVIN' their coffee beans!
For the inside I used more scraps.. but they were getting really small... and a computer generated sentiment.


Taking this card to our Sunday Breakfast with the locals... hope he gets a kick out of it. It was a hoot to make this one!

Have a great Sunday - I'll be back tomorrow with the Stampavie Challenge -
HUGS and-

 
Copics Used: E000, 02, 31, 33, 44, 53, 55, 57, 79; R02, 20, 46, 89; RV34; W03, 05 and Blender Pen