Monday, March 7, 2011

Sarah Kay’s “Juliet in the Field of Nasturtiums”

I'll be back later today to announce the winner of my Anniversary Blog Candy - but first I wanted to share a card and project I made for Stampavie's CHA booth! Both with the new Sarah Kay's "Juliet in the Field of Nasturtiums".
Isn’t she just gorgeous! Colored with my Copics – to match the My Minds Eye papers – Then matted with a fun Martha Stewart Pansy Border punch. Ok, so I know pansies and Nasturtiums are not the same, but they are close, and I love the flower border around her, especially once you add rhinestone bling for the centers of each one! Each layer of the card is attached with foam stickers for the shadow and depth on the card.


Then I went BIG! I took the same image, stamped her out and then copied her on my copy machine until she was big enough to be the center on a large wooden purse.

But first here is the inspiration of my wooden purse -
 I love this, one of my special items :0) It has LOTS of wear.. a few dings, scratches and a handle that won't stay attached any longer. But this little purse is probably on the edge of being classified and antique now! LOL I was pretty small when Grandma made this for me!

My version has more of a paper crafter feel to it - as you can see... But if Grandma had all the supplies then that we play with now... no telling what my little treasure would look like - she would have loved all these toys.. ahem... supplies.

So back to my purse -
When I saw this raw wood purse at Hobby Lobby.. I knew exactly which image had to go onto it. Juliet! My background I kept very simple. The wooden purse is “aged” and colored with a few different Distressing ink pads. Then a lace background punched with a dotted scalloped border punch. Yellow and white checked paper from my scraps, then my large Juliet that I have colored with my Copics and torn out. A few coats of Modge Podge is painted and let dry over night – For her “bed” of flowers I went through all my flowers and pulled lots of oranges, yellows and cream colored flowers, punched some Martha Steward Frond leaves and glued them all down. Centers again with lots of bling!


Will I carry this purse? Probably not, as I would tear off all the flowers first trip out. But it sits on my desk and holds some paper mementos from CHA. It is bright and cheerful and makes me smile. So have you ever enlarged your stamped images to make larger projects? Sometimes we forget we can do lots more with these beautiful images than just cards… think BIG!

Hope you enjoyed - and do pop back later today to see if you are winner of my Blog Candy!!!!
HUGS and-

Sunday, March 6, 2011

Dust It Off Sunday - No Stamps Today - the start of my Art Journal!

This still qualifies for Dust if Off Sunday I think - you see I dusted off a bunch of different products for this. Some I have had for YEARS... some a few months. All I have needed and wanted to play with!

Let me start off with explaining what this is and what I am thinking here - I LOVE Donna Downey. I just think she is a fun bubbly personality, that isn't afraid of trying anything new, and isn't afraid to show that art is not suppose to be perfect all the time. The important thing is to enjoy yourself, and learn about yourself in the process of playing with art. I totally love that. And heck she is just fun to watch on her blog. And of course in person.. He he Since I got to meet her at CHA I can say that!!   She makes these "Art Journals" They are basically notebooks of small pieces of art. All different, trying new things and new styles. For months I have been wanting to do this. But kept finding reasons to not go for it. Too busy with work, Husband, Family, Animals, House and needed DT items. But you know there is no reason that I can't work all my life into my Art Journal. It is about what I want it to be. So you may see a piece from time to time under Dust if Off - and then next time a challenge. And then from time to time just cuz I do something fun. Now Donna does most of hers with a video camera and shows from start to end. One I am just not that techno yet, Two I start and stop things and am just a mess right now, but who knows one day I may figure things out enough to show step by steps.. LOL

So here is page one - I say page one loosely here, as I don't have my book to put this in yet. I plan for the book to be a 6x9 vertical ... so hopefully I can find what I want to use. I have seen it in the past, now I just have to find it again!
Here are the products I dusted off to make this pieces -

Tim Holtz Fence Mask - had this for litterally years and never even opened it.

PanPastels - I wanted these forever, and end of the summer last year I was given the green light to go ahead and order a set to play with. I really got busy and didn't get to do much with them, but now... ok - loving these and will be trying lots with them! I got mine HERE - you can get them as sets, or individual colors. They are really fun to work with! So Smooth!

Basic Grey Sticker letters and scrap paper - For some odd reason when I purchased Basic Grey paper collections years ago, in my scrapbooking days,  I saved all the letter stickers that came with them. I cannot tell you how many times I had a bunch of these sheets in my  hand saying... why am I saving these letters I will never use them! Well.. ta da! I used them!  Then a scrap of an older Basic Grey paper for my leaf.

Old piece of Sassafrass Lass paper from long ago for the flower leaves.

This isn't a Mona Lisa or anything - it really is a VERY simple piece. I just stuck down the mask. Painted on the pastels in two shades and blended. Removed the mask. Then made my cloud with an eraser... yep.. just erased the blue coloring from the paper to show the white through as my cloud. I then tore out my flower petals, and leaf. Painted on my stem, and stuck down the pieces. I took my Copic Brush tip multi-liner to give a loose outline of things. and a fine point for the fence. Added my sticker words, hand wrote the word "Art". I sewed the edges of the entire piece and then backed with a dark red card stock with a bit of a mat to show. Tied some bakers twine in a white button and done.

The main thing for me is that I "PLAYED" for a while. No set rules or plan - and used products I have been really wanting to use. May be dorky... but it really made me happy. Not sure if Hubby understands this at all. He gave me a really odd look when I showed this too him when done. But that is ok, it is the journey of making this Art journal for myself. Just to see what I can do... and can't or shouldn't do.. LOL But to try new things and new styles myself. Instead of just surfing the web saying "Man I wish I could do that" ... Well why can't I? May not be as good as most, but I want to try and see how I enjoy it.

Hope all of this ramble makes sense... if not oh well.. I at least hope you enjoyed seeing my little flower today :0)

HUGS and-

Saturday, March 5, 2011

Animal Crackers - A few Donkeys, A Goat, - a Bad Puppy & A Minnie Update

Man... the wind is blowing HARD today! Gust up to 60MPH!!! Really makes satellite Internet not fun to work with. So I am really running late today - Sorry :0(

So today I have a few shots for you.. and then to close I have a "Minnie" update!!
Now take a look at this photo of Lacey... and tell me that these donkeys don't have a funny sense of humor! Lacey is one of our goof-balls. This Gal loves to "play" with you. When Hubby is in the pen with a hat on, as soon as he bends down she will steal it off his head. If you have shoe strings... she will un-tie them... if you have anything hanging out of a pocket, she will pick your pocket and run off with whatever it is! You can see it in her eyes... she is a real comedian!
Gloria - this one is a control freak. She likes to think she is the one in charge. Including Hubby and myself. She will scream out at us if we are not feeding fast enough. And she is very PUSHY when she wants something or to go somewhere. When moving through gates - she insists that she should be the first to go through... very frustrating this one - but with a face like that we still love her!
Miss Cocoa - she is our big girl. One of our standard Donkeys that roam the entire property. Now this girl has the life. She is in control of the other two standards. She leads, they follow. NO questions. She eats first, She drinks first, she decides where to bed down for the night. Sadly she is a tad skittish, oh she will let you rub on her rear end. And if she sees you have carrots or peppermints she will hang around, but she is very jumpy and will run from you if you move to fast. We purchased her as a full grown donkey, all ready bred. That is how we got Valentine her boy. So we don't know for sure what her life was like before us. She is calmer with women, then men. We think that maybe a previous owner was not so nice to her. But now for the rest of her life she has it pretty good, and is in total control of everything.
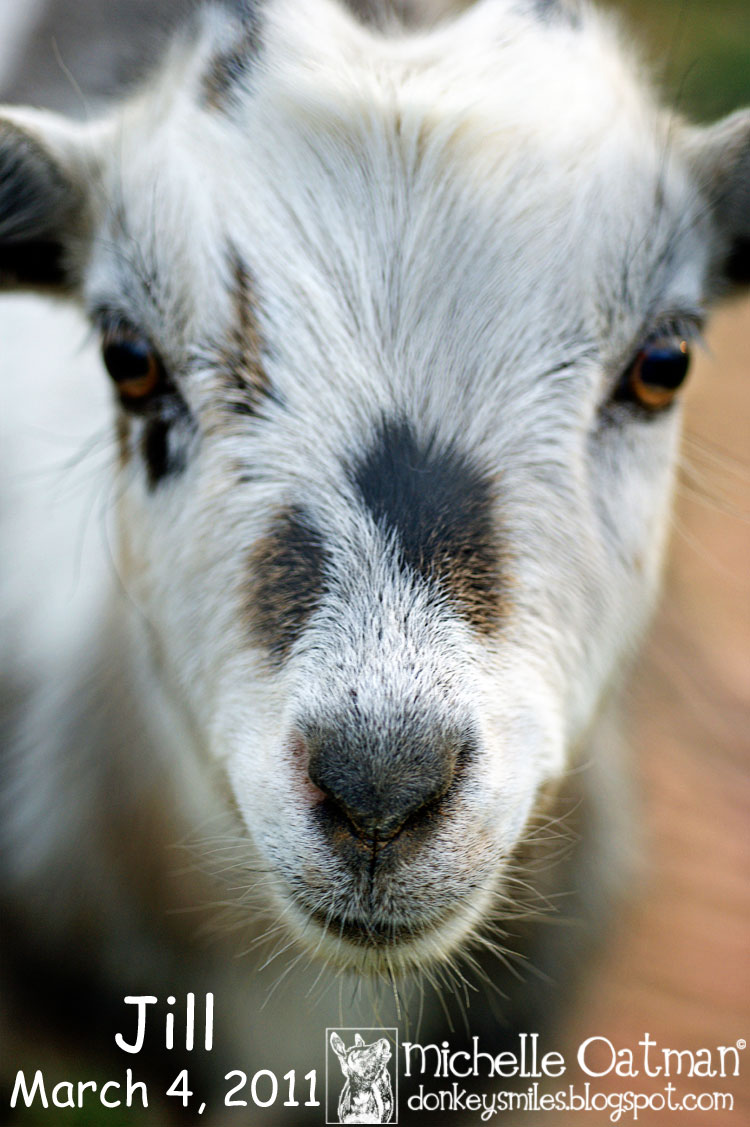
Last week I got a great photo of Chloe.. this week Jill wanted a close up taken. She is one of my super friendly goats. This one will climb right up into my lap. Cute when she was the size of a kitten... now well.. she is getting a bit big for that, even though she is the smallest goat we have.. so cute and tiny.. just love her!

Hmmm wonder why my house is always full of Dog hair?? LOL He is stunning though isn't he? Really gorgeous when he is just out of a bath and brushed and dry, but that look only last about 2 minutes. My Handsome Man.....
Bad Chica... and BAD MOMMY... Yep I got in trouble too while taking this photo. Just as I was snapping this photo of Chica, Hubby yells across the yard at me. "Are you letting her eat my new rose bush???"  My answer... "Well no, I won't let her eat it, but I didn't want to yell at her to stop until I got the cute photo first!" LOL Priorities you know??

AND NOW HOW ABOUT A MINNIE UPDATE!!!! Oops first correction, Not Minnie now her name is Dixie now... and lets see do you think she is being spoiled and treated up to my standards?
Actually I think this little girl is treated like a princess... totally spoiled, and totally loved! Her new owners are wonderful, we keep in touch with text messaging and we get fabulous photos of her. It is so wonderful to just have your phone beep and find a fun photo of a little puppy you miss. But I know down deep that this couple was the perfect match for Minnie..darn it...Dixie...  Only problem, we just wish they were closer to us, I think we would all have a lot of fun together! One day we will visit though!  Man... is she a gorgeous dog or what?

No Libbie photo this week, she is going through a bad stage, we are trying to get through it with patience and care. But all the barking and running through the house is about to drive me NUTS! Still love her to pieces, but seriously after a few hours of that high pitch barking at everything and at nothing I am loosing it! LOL Just tell me...  It will pass right???

Have a wonderful Saturday!

Friday, March 4, 2011

Just Magnolias and Hanglars - Anything Goes with Maybe some Glitter?

Hello! Today is our Just Magnolias and Hanglars challenge day! And today is our monthly Anything Goes challenge - with a bit of an option of a little glitter. We LOVE Glitter don't we!!
Are you getting tired of me playing with my old stamped images from wonderful internet buddies? I hope not, cuz I have having a blast coloring these Hanglars... don't get me wrong love using the Magnolias too.. but I have really missed using these Hanglars - and I am so so so excited! I actually will be getting a BRAND NEW set of Hanglars in the mail! Yep to little ole' me right here in TEXAS!! LOL I won them on Ebay... SO SO excited ... can you tell?

But until those get here - still having fun with the older ones ;0) I colored with my Copics  - I was really in a HURRY UP SPRING mood and went a bit nuts with some fun springy colors -
Yep... bright spring colors.. check! These are those new K&Company papers from the new 6x6 "Sweet Nectar" stack. (Don't forget there is one of these stacks in my Blog Candy!! Link to it at the top of my sidebar!) I sewed down the layers, and then created a band across the middle with a piece of the pattern paper and the Martha Stewart Border punch Eyelet Lace.

So what do you think of my flower???
I am SO in love with it! And so happy it came out! I made it!!! With a couple of different Spellbinders flower dies in all different sizes - I wet them, then inked them with red smooches then put the flower together and sprayed with vanilla Smooches (my option of glitter) - then the leaves are from another pattern paper from the collection. Topped off with a bright green button.  I will try and see if I can but together a tutorial on my flower... if you would like me too????

Then the sentiment is a metal charm from Making Memories - hugs and kisses - too precious!

Hope you like my BRIGHT card - and make sure to visit Just Magnolias and Hanglars Challenge to see all the DT cards and then join us for a chance at the prize!

Have a great Friday - and see you tomorrow for Animal Crackers!

Thursday, March 3, 2011

Stampavie's - Mo Manning Fairy Kiki

How cute is this image?
Another New Stampavie CHA image - by Mo Manning - I needed a baby card for a friend, and this image just seemed perfect! I had some fun coloring "Fairy Kiki" with my new AQUAMARKERS from Letraset - I know I have said it before... but I am loving these markers! The vibrant color is just stunning! Now this image really didn't require a lot of ink... :0) 
For the card I went with an Easel card - Love making these type of cards, and they are fun to see sitting up on display aren't they? 

Went with DCWV Nanna's Kids again - and for my normal I went with the boys stack in greens and purples, but I think it is still perfect for a little girls card. Just love this color combo! Sewed all the layers down, and cut the image and matting with Nesties Lacey Circles. Then I added LOTS of light green rhinestones around the edges. A satin ribbon ties everything off -
The base is the same papers, layered and then with the cream card stock center I stamped a Stampin Up Welcome Baby stamp - I very lightly colored in this image, I didn't want it to pop as much as the image - just subtle coloring. Large green rhinestones across the top for the easel to rest against.

Now I just need to meet up with new Mom and new Baby to give it to them! hope I can do that soon.. been dying to see this little one! Hope they like my card -

I have been working at my desk trying new things - I am not sure if I am liking it or not, but you know I am having a lot of fun trying new things, new products and a new style... may not look to great - but I am learning and enjoying it and that is what part of all this hobby is right? I might get brave and show this all off real soon :0)

Don't forget my Blog Candy going on ... link is at the top of my sidebar!
HUGS and have a wonderful day!

Wednesday, March 2, 2011

Me and My Space - A New Pen Desk Thingie...

Hello - I got a new toy.. ahem.. I mean "organizing tool". LOL I was at Target last week and saw this end cap with all these wonderful metal "vintage" looking kitchen items. I just fell in love with each piece... but totally went nuts for the silverware holder! That now sits on my desk as my  Pen and Tool Desk Thingie organizer! HA!
Now not only does it have a cool retro/vintage feel to it that I love, but it swivels around! Just love it.. My Eeyore cup has been on my desk forever, and it isn't going far, but it was so full that it was getting hard to get things in and out of it. This has three different "cups" to it and because it rotates around it is so easy to get to what you need. I have Pens/Markers in one, Tools in another and then my tall Smooches and water brushes in the third. So happy that I splurged on myself :0) I think it was like $14.99  -

The Eeyore cup went up onto my shelf right above my desk - so I can still see it. I have rubber bands and paper clips in it and it looks really cute next to the adorable little French Donkey that my wonderful Friend Heidi sent me :0) Love it... "she" hee haws when you squeeze her belly. She has gorgeous eyelashes so she must be a she....

Wanted to show you one of my tools while I was snapping photos here...
My Grandma's Ice Pick - I am not knocking any store bought paper piercers here - they all do about the same thing right? Poke holes... but this ice pick that I use as a piercer is special, one it was in my Grandma's kitchen drawer for decades, very sentimental, it is even missing the band at the base of the handle. I love having it on my desk and I do use it. This sucker is VERY sharp, even it is very old. I like that it is BIG and more sturdy to use. More to hold onto - and again I love when I use things that were Grandma's... there are lots of things from her in my craft room, makes me happy.  You might want to check out garage sales, antique stores or such and find yourself one like this, they don't cost hardly anything and really is a great "tool".
And I'll end today's post with another item in my new "organizer".. my light up Eeyore pen w/feathers! This again was a gift from someone special, and seeing this little Eeyore and those fun feathers on my desk is another item that just makes me happy!

What is on your desk that makes you feel good? Let me know!
HUGS and

Tuesday, March 1, 2011

A Spoon Full of Sugar - TAGS!

Happy Tuesday! Spoon Full of Sugar day and today I really stepped WAY out of my box for this weeks challenge. The challenge? To make a Tag - simple right? Well I am so in love with the vintage look - totally so in love with the talent it takes to make something look so perfect with that "random" scattered vintage look... So why did this tag take me over 3 hours to make? Cuz I am not too good at that random scattered vintage look and I stress over each placement!
Seriously I think I worked over 3 hours on this tag! LOL I started off with a kraft card stock, that I spritzed with Shimmerz and Smooches of brown tones. Then I sewed the edges. 
A Martha Stewart Eyelet Lace border punch across the bottom. Then do you love that velvet ribbon? It is from Doodlebug, found a bunch of colors in the bottom of one of my drawers - Then I tore two pieces of K&Company pattern papers and glued them down. Vintage lace across, Micheal's Bridal flowers with some rhinestones for just a little bling. My tag has a small tag of its own, punched with a Fiskar's Squeeze punch :0 ) and the sentiment from Papertrey Ink. Then my "image".....

I have been thinking about trying this for awhile... I look at it once and like how it came out, then look at it again and want to pitch it and do something different. But oh well... I am going to let you decide, should I have just stuck to coloring this gorgeous Stampavie Sarah Kay image? 
Started with a natural card stock, I stamped the image with embossing powder and then embossed with HIGH detail embossing powder. Then I sprayed the torn out image with Smooches Log Cabin mist. In person this really has a real shimmer to it! I then took a paper towel, and rubbed off all of the excess, and buffed the embossing powder. Again... one minute I love the look, and then the next I am really questioning this... LOL

I topped off my Tag with a tassel made from Bakers Twine from the Twinery - loving this stuff! 

Now make sure to head on over to Spoon Full of Sugar and see all the DT's Tags and play with us for a chance at a great prize!

HUGS and - Don't forget my Blog Candy :0)