Friday, October 14, 2011

Just Magnolias and Hanglars Challenge - Distressing!

OH my ... the them for this weeks Just Magnolia and Hanglar's Challenge this week is so me this week. DISTRESSING!! I feel like I have been running in slow motion all week, not getting done all that I plan to accomplish - It has just been a freak out week! LOL But I did take some time one night this week to sit and craft for this weeks challenge. Some chillin time just me and my craftin'!

I pulled out another "shared" Hanglar image. I love this one - too sweet isn't she? I chose my papers first, My Minds Eye Lost and Found papers, then I colored to match - She has a sort of vintage raggedy ann look doesn't she?  I inked papers, and used a distressing tool on others. I sewed everything. I then used a piece of my vintage lace from Etsy - and then wove some red ribbon through it, and tied a bow. I used glue dots to hold the ends in place, they were just not behaving well! My sentiment is a ticket I found in my stash, with a Alota Rubber Stamps Hello sentiment. Love this one - so cute and simple, and I like that it is small - so it fits anywhere!  Then three tiny red buttons to finish it off.

This one turned out cute and made me happy - a break crafting well spent you could say? Relaxed me I know that, and that gave me the push to get back to all the craziness!

Now pop over to Just Magnolias and Hanglars Challenge and see all the Distressing cards from the DT! Really gorgeous stuff...

Now I must return back to my list of things to do... I have a goal to get all caught up today!!! Hope I do so I can play tomorrow :0)

HUGS and have a wonderful Friday - see you tomorrow for Animal Crackers Saturday!

Thursday, October 13, 2011

Me and My Space - A look into my Goodie Boxes

Hi - Today for Me and My Space a day late I thought I would show you the inside of my Goodie Boxes :0) I have LOTS of different plastic boxes filled with all kinds of Embellishments. Many are from my Scrapbooking days, Lots of alphabets and such. While cleaning up my desk and a few drawers I kept coming across little bits of things. You know little boxes, packages and containers of those little things you want to keep close so you will remember to use them. Then they get buried and forgotten. Yep... that is what happened to lots of my things. 

Well I kept piling them up and soon I had a pretty big pile. I went to sort things into those many many boxes and decided that I would just create two boxes that would sit on top of my desk, easy access and hopefully as I purchase or get new things they will go into these boxes and not buried. That is the plan today anyway, not that my plans always work out. :0)

So here is box one....
 Now this box is the smaller things, brads, clips, a few special buttons, and such. I have a bigger brad box across the room. And it honestly is a pain to work out of and search in... so I rarely dig in it. This is some of my favorite brads, and newer brads. I Love those big jumbo brads, and above those are Doodlebug sugared brads.. oh yummy! In the center in the front... those are those tiny adorable Making Memories brads that look like tiny buttons. Above those are some new adhesive glittered round thingies I just found. On the top left.. those are all sorts of clips  - love office supply clearance sections... LOL Those little test tube things, I got those on clearance in a small scrapbook store YEARS ago and lost them in my stash. They are tiny little letters... interesting... need to use them. On the right you see all types and shapes of paper clips. There are other things in here too but that is the high lights...

Box 2 -
This box weighs a ton... It is all the larger things. Most all of this is older stuff from my scrapbooking days, that I have pulled out to try and use more. Clear acrylic shapes. Frame galore! All kinds of shapes, and colors. I really need to use up some of these. In the front middle are stick pins... This box has just a lot of different things... oh including those dominoes :0) don't know where they came from where I will use them... but I am going to try!

I will say I don't know if it cuz they are new on my desk, or just that I have thought about things I have seen recently, but I have been digging in these two boxes and using a few things recently! YEA... I really need to use up some stash... sigh....

Now I thought I might also start showing you some of my other loves... Hubby and I collect all kinds of old stuff - I have been sucked into Vintage Blogs lately... and thought if you all wouldn't mind I might share some of my things as well...... If you don't like it... I'll stop :0)


So first off I thought I would share the back wall of my "new" kitchen. You might remember last year... just two weeks prior to my bosses and friends Heidi and Stuart from Stampavie were to come and then leave for CHA... Hubby started tearing apart my kitchen. We took out all the cabinets, put in new, new counter top (love that butcher block top from Ikea!) And a new tile back splash. We decided to not put upper cabinets on this one wall in my kitchen instead he built me these wonderful shelves to show off just a few of my collectibles. Oh.. Hubby finished the kitchen just with just over a day to spare before our guest arrived! LOL

A couple of my biggest loves is my Yellowware stoneware kitchen things. I have LOTS of this. I just put a few bowls out here. And then I adore vintage kitchen tin. I especially love Nesco's Garden Girl collection. Don't know why... just love that little gardening gal - she is so... so... so.... Leave it to Beaver Momish... LOL you know what I mean? Hair perfect, dressed perfect, out to do her gardening...   Lets see what else is here... oh the birds are ones my FIL made years ago... we miss him. And having the birds all through out my house is a smile. I also have a few vintage repo toys - a few other pieces of pottery. And some older tin kitchen items. Really love that 1800's era kitchen tin. Just a bit pricey most of the time!

Well hope you enjoyed! Thanks for letting me share :0)
Have a great Thursday - see you tomorrow for Just Magnolia and Hanglar day!
HUGS and


Wednesday, October 12, 2011

Inky Impressions Challenge - A wonderful Sketch

Hello - The normal scheduled Me and My Space will be on Thursday this week. Today is the Inky Impressions Challenge. And this week we have a sketch to work with.

I will say it was a long weekend, and I was running just a bit late for this challenge. But whew got it done in time. The wedding on Saturday was absolutely GORGEOUS! and the Rain held off. Well actually it rained a bit in the morning, then cooled off and was wonderful for the wedding. Then on Saturday night and Sunday Morning it rained.. and rained... and rained!!!! We got right at 2 inches on our property!!! We spent Monday working on the pens and mixing up some of the donkeys a bit and seriously you could already see little tiny green sprouts coming up! Hubby is going to work on seeding the pens as well this week, but oh my those little green sprouts of grass seriously made me want to cry! Our animals have been so craving fresh grass to eat. And here it comes! We opened up a space between two pens and let all the Mom's and babies mix up and have some area that had more green in it.. and man have they been going to town eating up the green that is growing. I'll show photos this weekend ;0)

Ok but now lets get to the challenge! It is a sketch this week, and was perfect for using Angelica's Sled, Angelica's Pretty Gifts and Did Someone Say Presents sentiment. 
 So I followed the sketch with papers from Bo Bunny's Blitzen Collection - I inked the edges of everything with Rangers Dauber Snow White paint. The papers are gorgeous, but a bit bold, so I softened them with the white paint a bit. For the corner embellishment I found chip board piece, I painted it with the same white paint, then added three snowflake buttons.

I colored my image with my Copics. Not so happy with my sunset or sunrise... did not turn out at all like I was hoping... blech... Need to work on that for my next one. I again did the snow with my Marvy Snow Marker. Totally love that :0) I stamped the presents separate, the cut them out and popped them onto the sled. 
Isn't Angelica pretty? She is on sale right now at Inky Impressions... so hurry on over if you like her. They really have some adorable images.

And make sure to visit the challenge HERE  You don't have to use an Inky Image to join us, but we love it when you do :0)  But until you have your own Inky images do play along for a chance for the prizes OK?

Well that is it for today - I'll be back tomorrow with Me and My Space post - see you then!
HUGS and


Sunday, October 9, 2011

Dust It Off Sunday- A Magnet?

yes, for today's post I made a magnet! While sitting and watching the last Yankee Baseball Game... Boo Hoo... I was wanting to do something a bit different - something with a few of the products I had found while cleaning out the last couple of weeks. I had run across not one, not two but three boxes of Technique Tuesday's white chipboard shapes - I totally loved these when I bought them years and years ago! Now what was I going to make with them? Well I also came across three sets of stamps that I had gotten with a gift card a while back. I hadn't even opened them up yet... just been too busy with everything else I was working with. These stamp sets are from Stampers Anonymous, Tim Holtz Collection. "Good Thoughts" "Going Somewhere" and "Ultimate Grunge". (this set I think I just may be using a LOT more!) I totally love the look of Tim Holtz stuff... but I have a very hard time pulling it off. It is hard to be so free! LOL

Anyway... this is what I came up with...
Now you have to know here, I had no clue where I was going with this as I was making it. I was more or less just playing around with different things. First I started off by stamping the sentiment with embossing ink and embossing with espresso brown embossing powder. I then took the small checkerboard stamp from the grunge set and inked it with the embossing ink and stamped both sides of the chipboard, then heated with clear powder. (You can't really see that on the right I ended up covering most of it up) For some color I used my Pan Pastel paints and softly rubbed it down. making some areas a bit darker blue than others. I thought about just coloring with my Copics... but something I have learned... LOL ... Copics break down the embossing powder so don't do that ok?

Then I inked the edges with Tea Dye Distressing ink... it just had to have distressing ink on it, no choice there.....   I then went to play with making my flower. I found a scrap piece of pink card stock. I stamped it with the tiny alphabet stamp from one of the sets, I used Papertrey Vanilla ink - love that stuff. I then punched out three medium EK Success flower punches and two small. The petals were all inked with the Distress Ink, then I rolled them in towards the center with a paper piercer.... to give the flower more shape. To Fern punches and Branch punches all inked of course. I then glued it down around the edge of the oval. The center of the flower was going to be some sort of bling... but it just didn't feel right as I put that down. So instead I used a dot of my new Viva Pearl Pen. Oh my I am loving that thing!!

From there I thought I was finished. I stuck down a piece of magnet to the back and sat it there on my desk in front of me. But it was just so empty on the left side. So I dug through my newly found brads! I remembered seeing dragon fly brads... and yes, they were the perfect finishing item!

It was fun, different and well... for me personally I really feel the statement is true to heart! I plan on putting this one on my fridge and enjoying it.

It was nice taking a break from my normal and playing... We all should do more of that!

I am scheduling this one just prior to going to the wedding. I don't know when we will be home so I thought it was better this way - We have LOTS of rain in the forcast. Yes, RAIN... we need it so badly, but seriously not funny for an OUT DOOR wedding and reception. I am hoping and praying that it just keeps it cooler for this evening, and once things wrap up then the skies let loose! Maybe that will happen... I'll let you know.

Have a wonderful Sunday :0)

Saturday, October 8, 2011

Animal Crackers - Babies are so cute!

I just adore all types of babies... we all do... but come on is there anything cuter than this?
This is Sonia... She really unbelievable. Gorgeous and super friendly. I just melt in those beautiful eyes -
This is Ramon. The Man... LOL He is going to make someone a wonderful stud jack one day. Hubby was telling him the other night that maybe we would keep him for the day we retire his Dad Black Jack..... Uh.. no we can't do that... He tells all the good looking boys that though.

And then there is the newest baby... Jose! Ok... now this guy I am secretly thinking we may save for a future stud Jack! LOL I can not even explain how totally gorgeous he is. One he is small, that is number one in a good stud. And two he has a solid black face, a really desirable look. And three his fur... The only way I can describe it is solid black with a shadow of silver. I have tried to capture it by camera and I just am not doing it justice. The silver is primarily on his legs, and chest... he has a bit on his rear end and tail as well. It is just totally gorgeous! 

I have been asked how we tell the three babies apart... well... they are each totally different. :0) Sonia is short and has more of a red cast to her. Ramon is the tallest, and is a darker in color than Sonia. Jose he has the black face, and is the skinniest (at this point, he will fill in as he ages) I know I said something about trying to capture the three playing together... but it really hasn't happened yet -

Here Ramon was trying to play with Jose and Jose was just starting to play back... and then here comes MOM!!!! Look at that fast pace... those ears back... that stern look! Get away from my Son!!!!  She is starting to let him away more, but she is a very protective Mom.... LOL

Ok the Babies are cute, but so are my full grown children! Here is Josephina "Josie" and Gloria enjoying the shade of a tree. They are so sweet.  We added Gloria to our for sale page... but it is going to have to be a special person that I check out well! HA.. I do that with everyone that buys one our donkeys! ;0)
How is this for a LAZY afternoon photo? Seriously... they were all passed out! Love Jill on the far left totally laying across her son Louie...

I am so thrilled with our "future" stud buck. He is still pretty young - but man I am loving his coloring and personality. Still isn't as friendly as I would like but he is getting much better. You have to remember, we took him away from his Mom and all his friends, drove him in the front of the Truck and then dumped him in a pen with totally strangers, most of which where ladies telling him that they were in charge not him. Everyone is getting along much better now - and me... I am thrilled with getting Peso!


And I wonder why my floors are full of dirt, leaves and grass all the time? These two are the bestest of playmates. They play ALL the time!~ ok, they sleep too, but then they go right back to playing. When they are wrestling like this it gets hard to tell which one is Chica and which one is Autie! LOL  (Chica is on the left here, Autie on the Right upside down)

And then there is our girl Libbie... She plays hard too... but only when she is in the mood. The rest of the day she is on watch!! When outside she runs from fence to fence and checks on all of HER Donkeys and all of HER Goats - She is in control of everything that goes on - The other animals, the cat, the insects, the squirrels and even the wind. She barks to give her instructions and tell everyone what they are suppose to be doing. My little leader... Libbie...  LOL


Ok.. first I have to send out there a Happy Birthday to my Dad... he would have been 65 today. It is hard to believe it has been 11 years since we lost him. I miss you Dad... Happy Birthday.


Well.. busy day today... my best buddy Tracey's daughters wedding is this evening. I am sure it will be beautiful -

Have a great Saturday! Thanks for visiting me and my Animal Crackers :0)


Friday, October 7, 2011

Inky Impressions Inspiration - Holiday Tags!

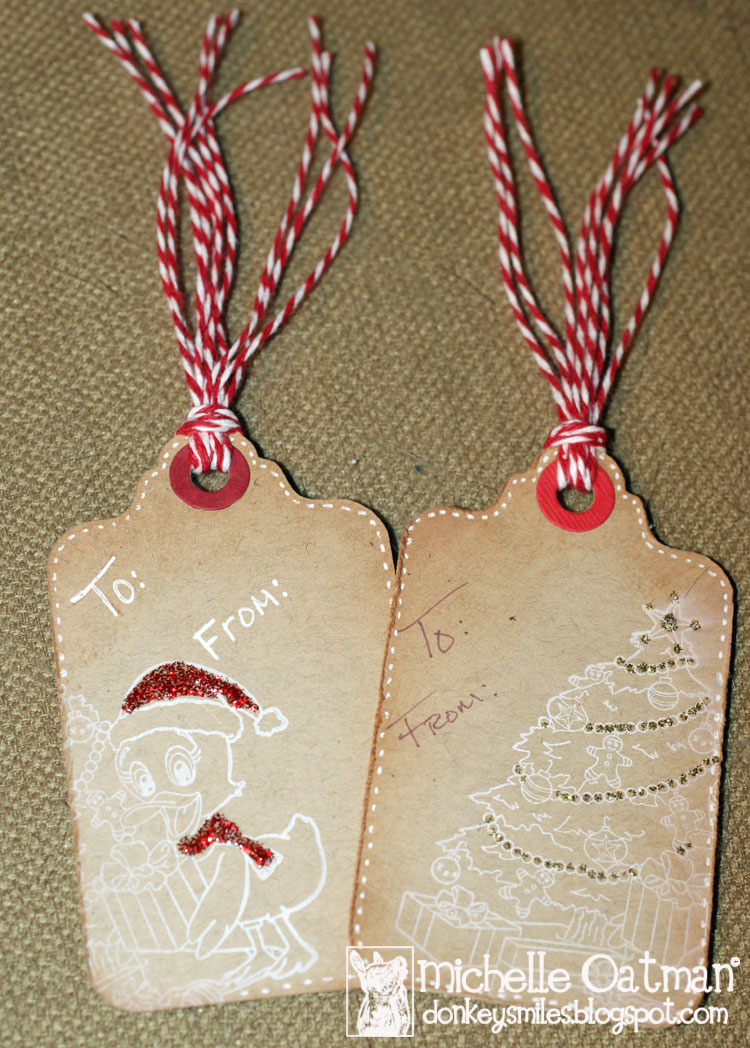
Today it is my turn to post on the  Inky Impressions Inspiration blog. This week - haven't had the energy for a lot of inspiration, and then I ran across a few of my simple tags from Christmas last year. Time is short during the holidays, and I am not the best at planning ahead and working in advanced, and these tags are simple, but personal for your gifts.
First you start with a tag die. Any brand works, or you can hand cut them. But I like to mass produce these when making them and dies do speed things up. My die is from Papertrey Ink. I cut out how ever many I am ready to work with and usually I cut them out of kraft card stock. I like the vintage look for my Christmas packages.

I then choose a stamp -
How totally adorable is Delilah's Ducky Christmas  So fun and cheerful! I just had to use this one, well... but it really didn't fit my vintage adult tag look -

Don't be afraid to use "parts" of your stamp!
With a vintage white ink I stamps off the side of the tag - yes.. sadly Delilah is missing but that adorable Duck was just not the best fit for my tag - and I just LOVE that Christmas tree! From there you do as much as you feel. For me I distressed the edges, inked the edges, added some twine at the top and a "To" and "From"... oh and I just have to put my bling on things. 


And I just couldn't stand it... Delilah needed a tag too - so for the kids receiving gifts - I made up a few special tags with her as well...
Simple red paper, and these tags are ready for their gifts. Now these are simple and you can make up a whole bunch of them in a very short time - - -


But if you have more time, and get started now you can really make them special!
Ok, I love this one more... I just may have to get busy now... I colored with my Copics, and added lots of stickles and bling on this one.


These tags add a wonderful personal touch to any gift! Now take a look at your stamps or part of your stamps and maybe you can add your touch to your gifts.


I hope you enjoyed my inspiration today - Thanks so much for looking.
MichelleO


Wednesday, October 5, 2011

Me and My Space - More Peeking in my Drawers and a Candy Winner :0)

Hi - Did you think I had fallen off the the earth again? Sorry - was a tough couple of days, allergies, headache, and then yesterday I had my first big eye exam since I finished up with my accident last year. I can report for that - everything is good. My "good" eye - I say that loosely cuz I am blind as a bat without my glasses, but she said everything was healthy and my injured eye seems to have healed well and adjusted well. Now I have an appointment in a month to see the Dr. that made my prosthetic eye and check on it and polish it. Yes... I have to have it polished once a year - Make sure I have that sparkle in my eye :0) Anywho... I have been wiped out and worn out. Having trouble even crafting the past week.

So for today I though I would show you the other three Canvas Dotted Shelf Baskets... I showed the first three last week - This is the three furthest away from my desk.

Top Drawer - 
 We will call this my hmmmm..... To alter drawer? To Decorate drawer? I don't know what to call it! But it has many of the smaller things I have in my stash to decorate and or alter in future projects. Blank Calendars, photo books, ornaments, Coasters, Jumbo paper clips, Canvas, and notebooks. Lots and Lots of little goodies to play with!!

Middle Drawer -
 Simply put.. Envelopes - yep... all sizes shapes and colors. Boring, but very necessary as a card maker ;0)

Bottom Drawer -
 Oops... Autie wanted to see in this drawer too... sorry :0)

Lets try again -
This is what I am calling my overflow and not used much drawer. I have a pile of mulberry roses that wouldn't fit in my main flower drawer. As I use them up these will go and fill in. The white Baby wipe box has little inks, pens and markers in it. The clear divided box has beads. And then in the front I have a couple of Fiskars tools for working with silk flowers.

Yep... overflow and not used much. Why here right next to my desk? I am hoping later to clean out a shelf across the room and move things there. But for now it is at least all sorted here.

Now I have been just giggling with excitement over this.... 

I was trying to come up with a way to label my canvas drawers that are my daily used items on my desk. ( I have showed them on a past Me and My Space Post ) NOW...  HOW CUTE DID THESE TURN OUT??!!  I used my Nesties Fancy tag, cut out blue card stock, typed out my labels... Bling, Ink Pads, Glues and Tapes... etc...  glued them onto the tags, then used mini brads and poked straight into the canvas and attached them! Totally makes me smile and look up and see them! I am working on labels for all the drawers all around me now!


Alright I'll settle down now and do the winner for last weeks stamps -

Random Integer Generator

Here are your random numbers:
22
Timestamp: 2011-10-05 00:19:17 UTC


Winner is:
Karen McAlpine said...I like your idea of the "working drawer". I use a file box type thing for this. But, it was over flowing. I did clean it out and refiled some of the things elsewhere. I keep several folders full of stamped images for quick cards. The blog candy stamps look scrumptious. I would love to give them a new home. Great job cleaning! Have a great day!!


Karen - email me (michelleo@hughes.net)  your mailing address and I'll get these out to you ASAP!

Alright I am off now - lots to catch up on and I think Hubby and I are going to run a few errands first and then come home to chores.

Have a wonderful Wednesday!
HUGS and